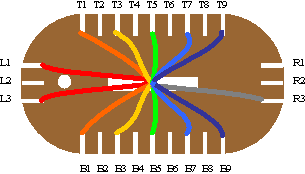
Using A Braiding Board - Pattern 8 - Round Cord
By Mike on Sunday, May 24, 2009, 23:10 - Permalink
 This pattern uses the same technique as the braiding disc to produce a very strong, tight-woven round cord. The density and strength of the finished work comes at a price - the labour of producing it - this is one of the slowest braid patterns to make.
Setting Up
Start with thirteen threads in a knotted end, arrange them any order you like (colour symmetry optional - only position matters):
 T1 + T3 + T5 + T7 + T9
B1 + B3 + B5 + B7 + B9
L1 + L3
R3
Move Groups You Will Need For This braid
Don't do anything just yet - this is just a description of the move groups you'll need - the order in which to perform them appears further down.
Move Group R
Work around the board, jumping two threads each time
Move:
B7 to R1
B1 to B7
T1 to B1
T7 to T1
R3 to T7
B5 to R3
L3 to B5
T3 to L3
T9 to T3
B9 to T9
B3 to B9
L1 to B3
T5 to L1
R1 to T5
Creating The Braid
OK, ready... You've already set up the threads as detailed at the top of the page (right?)
Now Just perform the moves listed above over and over. As you place each thread in its new position, put the thumb of your other hand over the centre of the braid in the slot and pull any slack out of the yarn
You may find it easiest to rotate the board as you work, so that you're always mving the threads with the same hand
Keep repeating this sequence until the braid reaches the desired length, then turn back to this page to find out how to finish off with a simple knot (other methods may not work for this pattern)
