Using A Braiding Board - Introduction
By Mike on Sunday, May 24, 2009, 22:30 - Permalink
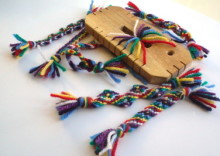 In this series of pages, I'll demonstrate how to use a braiding board to produce a variety of decorative and useful braided cords and ribbons.
The Braiding Board
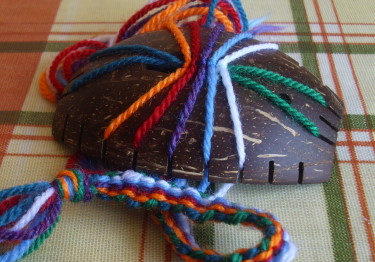 In this article, I made a braiding board out of a piece of coconut shell
Here's a shot of the coconut shell braiding board in action - making simple, flat braid.
Of course, there's no particular reason why it has to be made out of coconut shell...
 Here's a different one I made a few years ago out of a piece of hardwood reclaimed from an old pallet - alongside a selection of different types of braid it can be used to make.
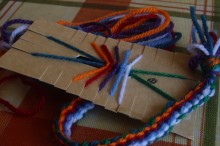 But even if you don't have any woodworking tools or skills, you can still try this craft - just make your own braiding board out of a rectangle of stiff cardboard - cut slits into it with scissors and it will work just as well.
Anatomy Of The Atomic Shrimp Braiding Board
The braiding board has a total of 24 edge slots to accommodate threads being woven or braided - nine slots along the top (which will be referred to throughout this instruction guide as T1-T9), nine along the bottom (B1-B9) and three each on the right and left ends (L1-L3 and R1-R3).
You don't have to make yours exactly the same as this, but if you're going to start off following the instructions on the next few pages, it will help if you do use the same design.
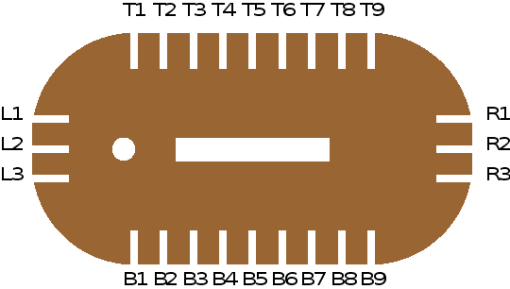
The braided work is formed through the letterbox shaped slot in the middle of the board - it will emerge through the bottom of this slot as work progresses.
The small circular hole may be used to thread the board on a hanging loop for storage, but its primary purpose is to identify the left side of the board - some of the designs that follow will rely on being able to tell that you're working from one specific side toward the other - without some mark identifying one side, it would be possible to accidentally flip the board around and lose track of what should happen next.
Techniques
Creating braids using this board actually requires only one technique - picking up a thread out of one slot and placing it in a different one. Simple - the only slightly difficult bit is repeating that action over and over upon the right threads in the right order.
Moves
So this most basic operation will be called a move - and will be described in the form: 'T8 to B9' - meaning: take the thread from slot T8 (i.e. the 8th slot along the top of the board) and deposit it in slot B9 (the 9th slot along the bottom of the board).
Move Groups
To (hopefully) simplify the instructions, each of these moves will be presented as part of a set, which I'll call a move group
A simple move group might consist of the instructions:
R1 to B1
R3 to T1
L1 to R3
L3 to R1
T1 to L1
B1 to L3
So a move group is just a list of moves - and the one above results in the threads at each end of the board being swapped over with each other.
Grouping them in this makes it easier to see the repeating patterns that are fundamental to this style of braiding - don't worry if that all sounds a bit complicated - it will make much more sense when you start doing it...
Braiding Materials
I've used ordinary double knit wool for all of the examples in the tutorials to follow, but I'm sure the techniques would work just as well with some types of string, raffia, or maybe even unprocessed natural materials such as reeds or grass. Silk threads should work too, although the result will be more delicate - it's all quite dependent on the thickness of the threads.
Maybe You've Seen This Before
Believe it or not, I developed this design of braiding board completely by myself (as a logical extension of the braiding disc, which my sister orignally showed me), and worked out the various different braid patterns by a combination of logic and trial.
Only after all of that did I discover that I had independently (and crudely) reinvented a very ancient braiding art from Japan called Kumihimo.
Next, we'll take a quick look at how to set up the braiding board, and how to finish at the end of making a braid.
Preparation
In order to start a braid, it is first necessary to select and cut your yarn. When starting out, best results are achieved by using pieces of wool that are all the same thickness and if possible, the same brand (later on, you might want to experiment with a mixture of thin and chunky yarns for a different effect)
Braiding using this board weaves the yarn back and forth through the finished piece, which means you have to cut your yarn to a greater length than you would like the finished braid - how much longer depends on the pattern you’re using, but twice as long is a good rule of thumb.
For the examples in the following pages, fourteen strands of wool are used - two of each colour for simplicity.
Starting Off
There are several different ways to start your braid...
 A simple knot - Here we cut all fourteen strands to the same length and knot them together into a single knot near one end - leaving an inch or so past the knot to serve as a decorative tassel
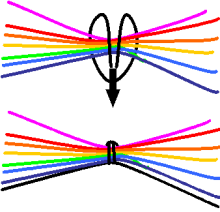 A plain end - Instead of cutting fourteen individual lengths of yarn, cut seven and make them twice as long.
Fold them all exactly in half, then knot one of them around all the others at the central point. You can use two half hitches, or just a simple double knot
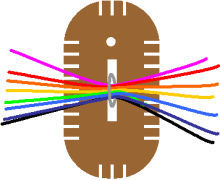 A Keyring - Cut seven lengths of yarn as for a plain end (above), pass them through a metal keyring or other similar item with a loop or ring, then drop the ring through the slot in the centre of the braiding board before placing the strands in their starting positions.
If the ring is attached to something too large to fit through the slot, push it up through the slot from underneath and thread the strands through it.
Ready For Action
Now, you're ready to start braiding - click - go to the next page and read the instructions on creating simple straight weave. (Come back to this page to read about finishing off your braid at the end).
Finishing
When you've created a braid of the desired length (using the instructions on the pages after this one), you'll need to remove it from the board and finish it in some way to prevent it eventually unravelling - here are a couple of methods:
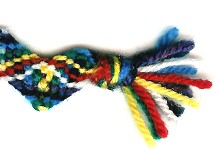 A simple knot - The simplest way to finish your braid is with a simple knot - remove the work from the board (don’t worry, it won’t unravel) and tie all of the threads into a single knot - the same as described in the starting instructions
Make sure the knot is in the right place before tightening it fully.
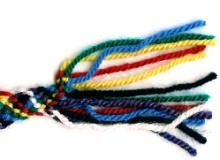 A flat tassel - This is made by tying the thread ends together in pairs - as detailed below:
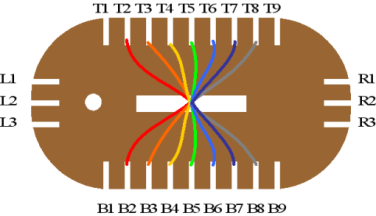 Return the threads to the following positions:
T2 + B2
T3 + B3
T4 + B4
T5 + B5
T6 + B6
T7 + B7
T8 + B8
Then take the thread in B8 and pass it over the others, into B1. Then take T8 and tie it in a double knot to B7 (pulled down to the end of the work, but not overtightened). Tie T7 to B6, T6 to B5 and so on, finishing by tying T2 to B1
Creating your own braid designs
Once you’ve tried a few of the patterns described in the pages to follow, you’ll probably start to see how the process of braiding actually works and will be able to imagine your own patterns - here are a few basic things to remember along the way:
If you keep one pair of threads specifically for moving from end to end through the middle of the braid (weft threads), these threads will run short of yarn quicker than the others, so you might need to start with them longer.
You could try simply omitting certain moves on alternate rows - for example, with the simple straight weave pattern (on the next page), you could try missing out the first pair of moves on one row, the second pair on the next row, and so on, back to the first row after you get to the end,
You could try switching adjacent threads in a particular pattern every time you’ve completed a certain number of rows
Your pattern needs to have some kind of repeating aspect to it and should ideally naturally return all of the threads back to their starting positions periodically, ready for another cycle - this is what creates repeating elements in the finished work.
It’s quite simple to make a short section of one pattern and switch to another pattern - just pick a suitable moment and rearrange the threads into the new starting position and off you go.
The selection and arrangement of colours for your work makes a very significant difference to the appearance of the finished work - some quite strikingly different effects are achievable just by changing the selection of colours - you could try four threads of a single colour, interspersed with three of another single contrasting colour - this might produce a bold striped braid - or when starting, you could try setting out the threads in a non-mirrored layout.
You might also wish to experiment with thicker or thinner wools, other types of thread or a mixture of different types or thicknesses of thread.
The final appearance of your braided and woven work will vary depending on the amount of tension you apply when moving the threads - if you pull tighter on the threads moving between top and bottom slots, this will tend to make the threads moving from end to end slots more visible in your finished work.
